Thursday, 22 September 2016

Animation Proposal

The brief of the assignment is to create an anti-gravity animation. The scene will be as normal until for the first time in the game the gravity will all of a sudden turn off causing objects to suspend in the air and float around creating wonder for the audience. All the objects will be related and suit the theme of the game. It is called The Last Voyage.

I have made 6 assets that will float around the spaceship interior, the first asset will be a space helmet, this will be white and feature a Great Britain flag (nationality of the astronaut) it will also feature two nobs that will control the oxygen flow. My second asset will be a pair of space boots, they will be colour coordinated with the helmet and will be placed next to/near the helmet in the space ship. In addition, I will also make a spray paint can, this is so the astronauts can repair flaws in the spaceship, I will texture the can with a label and ensure it looks realistic by making the top and bottom of the can the colour of the paint, I will not give it a lid as the nozzle makes is almost instantly recognised as a spray paint can where as a with a lid it could be mistaken for something else such as deodorant or industrial glue. Furthermore, I will include a Lego figurine, this will be a novelty mascot belonging to one of the astronauts, this will be yellow red and blue (typical Lego colours). I will also include a torch; this will simply be black with a green and red on and off switch. My spaceship will also feature a take away coffee cup, which will simply be white and cardboard. Finally I will include a wooden photo frame with a stand connected by a hinge. My spaceship will be very luxurious, I will create a separate cabin where the pilot and 2 co-pilots will sit, this is where all my assets will float, there will be more debt to the spaceship but this will simply be for aesthetics. In the pilots cabin there will be 3 big luxurious chairs and a control desk.    

My first major legal and ethical consideration would be the Lego figurine firstly, because Lego is copy righted meaning it would be illegal for me to use it without Legos permission which would usually come at a high cost secondly, if I were to recreate a figure similar to avoid any legal constraints I would be playing God as it would be my perspective of how the body similar to humans should look which may offend people of specific cultures. To overcome this issue I will contacted Lego and they have given me permission to use their name. There is a risk of copy right meaning I have to be careful that I do not copy any assets I have seen in other games or films, to combat this issue I have ensured that all of my assets have an original design that I created.

The target audience for this game would be 13-18 year olds firstly, because of the sci-fi genre, most adults would accept the reality that it is highly un-likely that they would every go to space and experience zero gravity however as a teenager especially in the first few year this still may be a hope they wish will become a reality therefore they will particularly engage with the game. To appeal to my target audience I have used appropriate colours (gold and blue) to texture the interior of the spaceship so it will not look too bold yet dull. I have also modelled assets that will appeal to them such as the Lego figure in addition, I will make my scene sci-fi by setting in in a futuristic spaceship, to achieve this look and appeal to sci-fi fans I will make my spaceship very sleek with sharp edges, it will be very spacious and use appropriate colours, these will be gold and metallic dark blue.

Firstly I will create the space ships interior, since this does not have to be very complex I will not need to use many advanced tools so I will simply use the manipulator, the merge tool and possible face selection. The second step would be modelling my assets, here I will use the vertex selection tool to create complex curves, I will also use Booleans to create advanced models. I will also use the UV mapper to ensure that my textures fit the model and the right proportion, I will also use Adobe Photoshop to create some of my own textures if I cannot find what I am looking for. Finally I will use the pivot point tool to change the pivot point when creating objects such as a hinge. 

To complete this project I will require a background knowledge in this field therefore I will research other games and films that have antigravity scenes to see different interpretations and build my own perspective of what it should look like. I will also require a computer with modelling software downloaded ensuring I can digitally model all my assets.    


Thought this project I will have to manage my time carefully as there is a lot of individual tasks I must complete thought the unit including research, modelling and animating. I will manage my time by creating a Gantt chart ensuring I spend the correct amount of time on each task however I will leave a small amount of overflow time in the unlikely event of unexpected errors or challenges.          

Thursday, 8 September 2016

3D Animation Production Journal

08/09/2016
In todays lesson I have created my spaceship interior equipped with a centre column, 3 chairs, 6 tables and a control pannel. I have used the extrusion tool to create the centre column, I have textured most of the interior and I have used the transparency tool in the texture settings to create a dividing window.


13/09/2016
In this lesson I completed 2 assets and started a third. I created a torch, a space helmet and an aerosol can. When creating the torch I extruded a sphere to create a lightblub and I also extruded and rectangle to create an eurganomic on and off button, to create the body I simply deleted faces of objects and merged them. The helmet was a bit more complex as I created my own texture in Photoshop using shapes and images off google, I did intend for the back of the helmet to have the Nasa logo on however due to the shape of the helmet and texture I could not get it to fit without it being the correct shape so I made colour cordinated colour strips to make the helmet match the interior of my spaceship. To create the aerosol can I dinply merged shapes however I still need to add textures which I intend to do next lesson.


15/09/2016
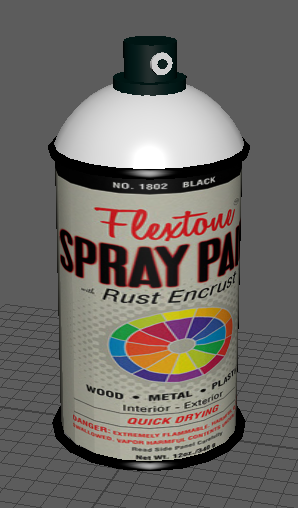
At the start of todays lesson I finished my spray paint aerosol can by texturing it, the finihsed product is shown below, I did intend for the dome underneth the nozzel to be black like the colour of the paint however if I did this you cannot see where the nozzel finishes and it looked like one shape so I made it white and I feel this enhanced the look of the spray can.

Today I also created a coffee cup that I can put on the tables or desks, I used the face selection tool to select all the faces at the top of a cylinder and expanded it to make the cup slant outwards as it got taller, I dont the same with the lid however to created the slanted dip in the lid and the hole that you sip the content out of using Bevel and Difference.

20/09/2016
As shown above I also stared to create a Lego Figure, I created the head by creating a sphere and reducuing the amount of divisions on it making it more the shape of a Lego head. I created the arns by merging cylinders and spheres then to connect it to the body I selected the faces and dragged them into the body. To create the rest I used the merge tool after manipulating different polygons into the shape i needed them using the extrustion tool.

This is mty completed Lego figure. While texturing this asset I ran into the issue of texturing the body (red area(chest and arms)) the texture was not large enough to cover the whole body so I had to sample the colour in Adobe Photoshop and make a plain red texture so the whole body matches and looks correct.

22/09/2016
Photo frame
 In todays lesson I created a photo frame, as you can see. I created it by using the manipluator tool and lots of merging, I also added a slight curve to the frame by selecting the one vertex in the top left corner holding shift and selecting the other in the bottom right, I then dragged these out so the were the same length, I feel this adds a cretian appeal to my photo frame. When it came to texturing I added the wood texture I found online and for the image in the photo frame I selected one from my personal album from a skydive I did over the summer I the simply adjusted it on the UV Editor to it ffit inside the photo frame. I wanted to add a pivot poing into my frame where the stand hinges onto the frame, after some research I did not come up with a sloution therefore I had to be creative and think of one myself. As seen in the second image below I added a pivot point into the photo frame where the stand joins the frame. I done this by creating teeth on both sides and then adding a bar through the middle joining the two.


13/10/16
I have currently created all my assest and textured them, I have imported all my assest into the master scene (spaceship interior) I thenstarted the animation process. Firstly I poistioned all of my assets whereI wanted them in my masterscene, I then had to make my background (the polygons that I will want to saty still) Active Rigid Bodys, I done this in FX mode of Maya, Then one by one I animated each asset, Firstly I made the object and Active Passive body, I then applyed gravity to the object, so the object floated instead of falling I made the strength of the gravity 0.25 instead of 9.8 (standard on earth) and changen the direction so the object essentially was pulled up instead of down, with this done I could then change the direction so the objects floated around the room. objects such as my photo frame was split into two objects (the stand and the photo frame) I applied a gravity feild to each of them so the stand moves on a pivot point and as a whole the photo frame rotates in the air. The more assests I animated I found the scene as a whole became alot more laggy, this was a big problem as I couldnt see my assests float smoothly and therefor couldt adjust the strength or direction accordingly, to resolve this problem I tried deleting the assets history to free up some space however this only resolved the problem slightly and it still lags. To resolve this problm I have had to re-design my spaceship, as you can see in the image below my new spaceship is alot more simple with less features such as tables and chairs, this is so I could work and be time effective as my scene no longer lags. This was a minor hick-up as i did have to re-import all my assets however the final result made it woth it.


Key Framing is the method of animation we chose to create out final animation scenes with. At first I experimented with applying gravity to each individual asset, I found this a long a tedious task as each individual asset must be made an Active Rigid Body and everything that I did not inted to be floating around such as chairs and walls. Secondly each asset must have an individual gravity feild meaning more time is taken up and also all the setting must be the same such as gravity strength and then the direction in which the gravity pulls the object so they dont just float upwards. I fould key framing was much easier after experimenting with it, I could simply move each asset to where I wanted it to be at that specific frame and create a key frame, Maya would then automatically create the path in which the product has to take in order to get to the location by that time. To achieve the look of slow rising, floating objects I had to make them travel a small amount of distance over a longer period of time, to make them go faster I would make them cover the same amount of dintaces in less time (frames) meaning the asset has to travel quicker to get there. As you can see in the image below, the red lines indicate where I have placed a key frame, I origionally put in a key frame every 100 frames however, I found this gave it quite a blocky overall finish and the objects moved incosistently so from this I had to place key frames more frequentley. Eventually after much trial and error for this asset I have placed key frames at frame 1, 19 ,150, 295, 299, 300, 310, 334 and 350, this is to ensure the asset floats smoothly and consisteltly with a small fluid rotation making the animation as realistic as possible.


Production Scedule of 3D enviroment


I created a production schedule the help the project run smoothly and efficiently I used this document from start to finish to ensure all the mini deadlines were kept to meaning once the final day came the project was finished. It was extremely helpful as if I did not meet a mini deadline I was aware and able to catch up so the process was not delayed. Again this is very cost effective and missing a release day would have a lot of negative outcomes including, loss of loyal customers and possible sales, by ensure the deadline is met this problem is resolved. This also ensure my target audience get the game on time and finished to a high standard.

Anti Gravity Starter Scene

Over the summer I created my first anit-gravity scene as a starting point for my assignment. As shown in the images below I have incorporated two space helmets, two pairs of space boots, a lamp, a camera and a torch. I have animated this scene to make these objects float seamlessly, some do collide and ricochet off each other however, this was done intentionally to add to the overall anti-gravity effect as the lack of gravity provides no direction. The feedback I received from fellow classmates stated: the speed at which the objects floated at was accurate and overall the scene looked like it could be real

Thursday, 21 July 2016

Master Scene Journal

Today I started the creation of my master scene, Initially I started by creating a large flat polygon cube that will be the floor that everything will sit level on. After I had created this using more polygons I created a basic layout of my enviroment by creating roads and leaving spaces inbetween where I can locate different buildings and assetss. This took all of the lesson however I plan to start importing the different assesets nect lesson.

In todays lesson I imported 3 assesets into my master scene, my skyscraper two shopfronts however I found that the more objects I imported the more laggy Maya became so I had to be pacient as even small manouvers took longer than they should. I located the skyscraper in the middle on my village to ensure i is the focal point of my village. One more proplem I found was that where I have created all my different assets in different files the proportions were not the same when I imported them into the master scene.

I continued to import more assets into my master scene in this lesson. Now they are almost all imported and my master scene in almost complete, at this stage I believe the textures I selected were very apropriate as now the master scene is almost complete I can see that all the textures look well together and nothing sticks out for the wrong reasons in addition, all the assets suit eachother as they follow the same style as have they all have the same sharp clean angles which enchaces the overall look of my enviroment.

Finally I impoted the last of my assests into my master scene today so now it features: a skyscraper complete with helicopters and landing pads, 2 apple stores, a convenience store, a restraunt, 2 different types of bins, a vending machine, a carpark, and 3 different tyes of vehicles. Looking back on this process I would say the finished product if very effective and looks very sleek, clean and modern which is the look I was aiming for however to improve upon this I feel before I imported all the different assests I should have individually opened each file and merges each asset to one object meaning it will not take up as much space therefore not making the enviroment as laggy as it was however I am proud on the product.  


Evaluation of 3D Enviroment


Evaluation of 3D Environment

The brief instructed me to create a futuristic environment, there were many different approaches and styles I could choose from however I chose to keep it clean with advance technology by using straight lines and neutral colours, this would be my interpretation of a futuristic environment. I will further explain the assets that I have created and why I made them.

Initially I gained more knowledge of the area by researching other people’s interpretations of 3D environments. I then created a mood board that contained different futuristic assets including I found a model of an artificial tree concept created in China, an armoured vehicle, a futuristic fire truck.and buildings from this I took inspiration and made my own versions improving and adapting the designs as I go. I found this very helpful as it gave me a guideline and a step up as without this I would have gone into this project blind. Through the planning process I feel it would have been better if we made sketches or rough 3D models of our initial designs before researching so we could see how our initial ideas could be improved upon rather that adapting other people’s ideas. My initial sketches were made up of and artificial tree, an armoured hover vehicle, a vaporising bin, a lamppost, a teleport bus stop and a skyscraper, these were all initially coloured in with what I thought would be appropriate looking when it came to the texturing process. 

My original ideas were to make a very durable looking town by making it look very blocky and using metal textures. My initial skyscraper had a cone at the bottom so people could not climb up it, the bin was made of metal and had hazard tape round the top and bottom. I also created a shop with a rotary door to file large crowds with a big CCTV camera on top and a mechanical claw to move objects or people. I later adapted my designs by changing the textures to more neutral colours and I preferred a sleeker looking village as I feel this was more futuristic that my initial design.

To create my 3D environment I used a variety or tools, the main tool I used was the manipulator with this I could move objects, shapes, faces, vertexes and edges to create different shapes. I used the manipulator tool to create the artificial tree seen in my environment I used it to position the different polygons together in the appropriate places to ensure it look realistic. Booleans is another key tool I used when creating my village, it allowed me to merge shapes in order to create things such as windows or other objects. I used this to create my restaurant windows; this allowed me to make it appear that the same shape has a window cut out of it. In addition I used the extrusion tool, this allowed me to select faces, edges or vertexes and drag them out, I usually added divisions in order to extrude smaller segments of an object, this tool allowed me to create the mechanical hand coming out of one of my shop faces. UV mapping is a tool that ensured I could apply textures to objects accurately, making sure that the edges line up with each other and it is evenly spread and in the correct proportion. Examples of the use of this tool can be seen in multiple places in my environment but mainly on the vending machine, I used a Coca-Cola texture to decorate it. Finally I used the fill hole tool to create a face over holes, an example of where this has been used in my environment is on the edge of the wind turbine blades on top of my restaurant, to create these I started with a cylinder, deleted the edges so I could move the vertical edges without then overlapping or passing through any other edges then when they were all in place I used the fill hole tool to give the blades a clean finish.  

One of my main features of my environment is my skyscraper, I am particularly proud of this model as I put a lot of effort and time into creating it. It is split into 3 smaller buildings connected by a series of tunnels raised off the ground level, I extruded these 3 smaller building from a regular polygon however all 3 shapes fit into each other as the building can retract in in the case of an earthquake to make it stronger. Another feature in my environment is a restaurant, I created this by merging a number of polygons I had previously extruded and then using Booleans I added in windows, I am pleased with the final outcome as it suits the style of my environment. Finally I created a mini apple store that is fully furnished with iPad’s Macs and Apple Watches. I like this feature as it enhances the look of my environment and fits in well. I made the walls of the Apple Store transparent to make them look like windows, I done this by making the selected faces light blue then changing the opacity so the interior and products can be seen from the outside.

I sourced most of my textures from Google however because I used neutral colours I also used the colours available to me on Maya. If I were to go back and start the texturing process again I would get a selection of textures to start with so they are available to me when I needed them and I could have some backups in case they didn’t work, I would also have attempted to make some of my own by either taking pictures or using Photoshop. My skyscraper uses a light grey brick texture, I used this as it looks like a futuristic alternative to bricks. Another texture I used was Chrome ENV this is one of Mayas default textures and it makes the object look reflective I used this as it was very modern and sleek. I used a grass texture to add some greenery into my environment to show that it is still looking after the environment. To decorate my armoured hover vehicle aka THE ENFORCER I used a steel texture, as I wanted it to look aggressive.    

When starting the modelling process I sketched out my initial ideas of what I wanted my assets to look like, I then took them and made rough 3D models in Maya, once I had a model for each sketch I when back and made improvements and also textured them. I later imported them all into the same document and made some minor adjustments to finish it. I then animated my car to sake the camera round the environment.

 I feel my environment suits the brief well as it meets all the specification points, My completed environment exceeds my initial expectations as I have included all my initial assets and made some more to enhance the feel the viewer will receive. I feel to improve my environment I would make it a bit bigger and pay attention to smaller details and also ensure all my assets are to the correct scale in the first place to save time later in the project.