Showing posts with label Unit 67 C3. Show all posts
Showing posts with label Unit 67 C3. Show all posts
Tuesday, 3 January 2017

Tuesday, 1 November 2016
3D Animation First Export
Here is my first export of my 3D
Animation. I feel many features of this are successful however, there are
also some shortcomings and I will evaluate both and then improve my animation
accordingly.
Firstly, all the assets float which is what I originally intended
for them to do, when floating they also travel in an assigned direction meaning
that the helmet especially looks very effective as it does not only float
upwards in a straight line. The gravitational strength applied to the assets is
also very realistic as it is not to strong or weak therefore there are no
sudden jolts, they all start to float at the same time and move at the same
speed.
Despite the many successeses there are still some features that are holding my animation back from the high quality standard I am aiming for such as, when in the air not all of the assets rotate in the air,
assets such as the helmet and the boots stay as the were originally and start
to float and although this is plausible in space it looks more effective if the
rotate in the air as it make the whole animation look more smooth creating the
wonder I need to capture and portray to the audience as if they simply move
without rotating the whole piece looks very stiff and uncomfortable and therefore
unrealistic. In addition, the boot also floats through the chair despite being
an Active Rigid Body, I am not sure why this has occurred however this is
impossible to happen in real life and therefore I must improve this so the boot
possibly bounces off the chair instead as this is what would happen in real
life and as I am aiming for a high quality realistic finish this must be
improved.
Overall I feel up until my first export I have made a great
animation as the majority of the work as been completed already however there
are some necessary improvement I must make in order to achieve the high quality
finish I strive for in order to create wonder and amazement for the audience.
Thursday, 8 September 2016
3D Animation Production Journal
08/09/2016
In todays lesson I have created my spaceship interior equipped with a centre column, 3 chairs, 6 tables and a control pannel. I have used the extrusion tool to create the centre column, I have textured most of the interior and I have used the transparency tool in the texture settings to create a dividing window.

13/09/2016
In this lesson I completed 2 assets and started a third. I created a torch, a space helmet and an aerosol can. When creating the torch I extruded a sphere to create a lightblub and I also extruded and rectangle to create an eurganomic on and off button, to create the body I simply deleted faces of objects and merged them. The helmet was a bit more complex as I created my own texture in Photoshop using shapes and images off google, I did intend for the back of the helmet to have the Nasa logo on however due to the shape of the helmet and texture I could not get it to fit without it being the correct shape so I made colour cordinated colour strips to make the helmet match the interior of my spaceship. To create the aerosol can I dinply merged shapes however I still need to add textures which I intend to do next lesson.


15/09/2016
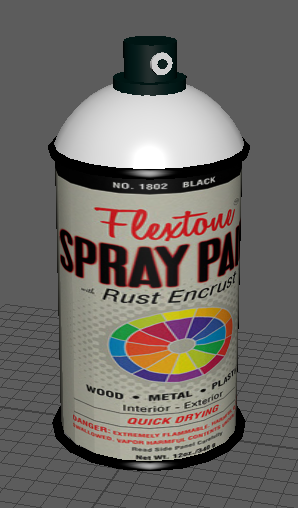
At the start of todays lesson I finished my spray paint aerosol can by texturing it, the finihsed product is shown below, I did intend for the dome underneth the nozzel to be black like the colour of the paint however if I did this you cannot see where the nozzel finishes and it looked like one shape so I made it white and I feel this enhanced the look of the spray can.

 Today I also created a coffee cup that I can put on the tables or desks, I used the face selection tool to select all the faces at the top of a cylinder and expanded it to make the cup slant outwards as it got taller, I dont the same with the lid however to created the slanted dip in the lid and the hole that you sip the content out of using Bevel and Difference.


 20/09/2016
As shown above I also stared to create a Lego Figure, I created the head by creating a sphere and reducuing the amount of divisions on it making it more the shape of a Lego head. I created the arns by merging cylinders and spheres then to connect it to the body I selected the faces and dragged them into the body. To create the rest I used the merge tool after manipulating different polygons into the shape i needed them using the extrustion tool.
 This is mty completed Lego figure. While texturing this asset I ran into the issue of texturing the body (red area(chest and arms)) the texture was not large enough to cover the whole body so I had to sample the colour in Adobe Photoshop and make a plain red texture so the whole body matches and looks correct.
22/09/2016
Photo frame
In todays lesson I created a photo frame, as you can see. I created it by using the manipluator tool and lots of merging, I also added a slight curve to the frame by selecting the one vertex in the top left corner holding shift and selecting the other in the bottom right, I then dragged these out so the were the same length, I feel this adds a cretian appeal to my photo frame. When it came to texturing I added the wood texture I found online and for the image in the photo frame I selected one from my personal album from a skydive I did over the summer I the simply adjusted it on the UV Editor to it ffit inside the photo frame. I wanted to add a pivot poing into my frame where the stand hinges onto the frame, after some research I did not come up with a sloution therefore I had to be creative and think of one myself. As seen in the second image below I added a pivot point into the photo frame where the stand joins the frame. I done this by creating teeth on both sides and then adding a bar through the middle joining the two.


13/10/16
I have currently created all my assest and textured them, I have imported all my assest into the master scene (spaceship interior) I thenstarted the animation process. Firstly I poistioned all of my assets whereI wanted them in my masterscene, I then had to make my background (the polygons that I will want to saty still) Active Rigid Bodys, I done this in FX mode of Maya, Then one by one I animated each asset, Firstly I made the object and Active Passive body, I then applyed gravity to the object, so the object floated instead of falling I made the strength of the gravity 0.25 instead of 9.8 (standard on earth) and changen the direction so the object essentially was pulled up instead of down, with this done I could then change the direction so the objects floated around the room. objects such as my photo frame was split into two objects (the stand and the photo frame) I applied a gravity feild to each of them so the stand moves on a pivot point and as a whole the photo frame rotates in the air. The more assests I animated I found the scene as a whole became alot more laggy, this was a big problem as I couldnt see my assests float smoothly and therefor couldt adjust the strength or direction accordingly, to resolve this problem I tried deleting the assets history to free up some space however this only resolved the problem slightly and it still lags. To resolve this problm I have had to re-design my spaceship, as you can see in the image below my new spaceship is alot more simple with less features such as tables and chairs, this is so I could work and be time effective as my scene no longer lags. This was a minor hick-up as i did have to re-import all my assets however the final result made it woth it.

Key Framing is the method of animation we chose to create out final animation scenes with. At first I experimented with applying gravity to each individual asset, I found this a long a tedious task as each individual asset must be made an Active Rigid Body and everything that I did not inted to be floating around such as chairs and walls. Secondly each asset must have an individual gravity feild meaning more time is taken up and also all the setting must be the same such as gravity strength and then the direction in which the gravity pulls the object so they dont just float upwards. I fould key framing was much easier after experimenting with it, I could simply move each asset to where I wanted it to be at that specific frame and create a key frame, Maya would then automatically create the path in which the product has to take in order to get to the location by that time. To achieve the look of slow rising, floating objects I had to make them travel a small amount of distance over a longer period of time, to make them go faster I would make them cover the same amount of dintaces in less time (frames) meaning the asset has to travel quicker to get there. As you can see in the image below, the red lines indicate where I have placed a key frame, I origionally put in a key frame every 100 frames however, I found this gave it quite a blocky overall finish and the objects moved incosistently so from this I had to place key frames more frequentley. Eventually after much trial and error for this asset I have placed key frames at frame 1, 19 ,150, 295, 299, 300, 310, 334 and 350, this is to ensure the asset floats smoothly and consisteltly with a small fluid rotation making the animation as realistic as possible.

In todays lesson I have created my spaceship interior equipped with a centre column, 3 chairs, 6 tables and a control pannel. I have used the extrusion tool to create the centre column, I have textured most of the interior and I have used the transparency tool in the texture settings to create a dividing window.

13/09/2016
In this lesson I completed 2 assets and started a third. I created a torch, a space helmet and an aerosol can. When creating the torch I extruded a sphere to create a lightblub and I also extruded and rectangle to create an eurganomic on and off button, to create the body I simply deleted faces of objects and merged them. The helmet was a bit more complex as I created my own texture in Photoshop using shapes and images off google, I did intend for the back of the helmet to have the Nasa logo on however due to the shape of the helmet and texture I could not get it to fit without it being the correct shape so I made colour cordinated colour strips to make the helmet match the interior of my spaceship. To create the aerosol can I dinply merged shapes however I still need to add textures which I intend to do next lesson.


15/09/2016
At the start of todays lesson I finished my spray paint aerosol can by texturing it, the finihsed product is shown below, I did intend for the dome underneth the nozzel to be black like the colour of the paint however if I did this you cannot see where the nozzel finishes and it looked like one shape so I made it white and I feel this enhanced the look of the spray can.


As shown above I also stared to create a Lego Figure, I created the head by creating a sphere and reducuing the amount of divisions on it making it more the shape of a Lego head. I created the arns by merging cylinders and spheres then to connect it to the body I selected the faces and dragged them into the body. To create the rest I used the merge tool after manipulating different polygons into the shape i needed them using the extrustion tool.

22/09/2016
Photo frame
In todays lesson I created a photo frame, as you can see. I created it by using the manipluator tool and lots of merging, I also added a slight curve to the frame by selecting the one vertex in the top left corner holding shift and selecting the other in the bottom right, I then dragged these out so the were the same length, I feel this adds a cretian appeal to my photo frame. When it came to texturing I added the wood texture I found online and for the image in the photo frame I selected one from my personal album from a skydive I did over the summer I the simply adjusted it on the UV Editor to it ffit inside the photo frame. I wanted to add a pivot poing into my frame where the stand hinges onto the frame, after some research I did not come up with a sloution therefore I had to be creative and think of one myself. As seen in the second image below I added a pivot point into the photo frame where the stand joins the frame. I done this by creating teeth on both sides and then adding a bar through the middle joining the two.


13/10/16
I have currently created all my assest and textured them, I have imported all my assest into the master scene (spaceship interior) I thenstarted the animation process. Firstly I poistioned all of my assets whereI wanted them in my masterscene, I then had to make my background (the polygons that I will want to saty still) Active Rigid Bodys, I done this in FX mode of Maya, Then one by one I animated each asset, Firstly I made the object and Active Passive body, I then applyed gravity to the object, so the object floated instead of falling I made the strength of the gravity 0.25 instead of 9.8 (standard on earth) and changen the direction so the object essentially was pulled up instead of down, with this done I could then change the direction so the objects floated around the room. objects such as my photo frame was split into two objects (the stand and the photo frame) I applied a gravity feild to each of them so the stand moves on a pivot point and as a whole the photo frame rotates in the air. The more assests I animated I found the scene as a whole became alot more laggy, this was a big problem as I couldnt see my assests float smoothly and therefor couldt adjust the strength or direction accordingly, to resolve this problem I tried deleting the assets history to free up some space however this only resolved the problem slightly and it still lags. To resolve this problm I have had to re-design my spaceship, as you can see in the image below my new spaceship is alot more simple with less features such as tables and chairs, this is so I could work and be time effective as my scene no longer lags. This was a minor hick-up as i did have to re-import all my assets however the final result made it woth it.

Key Framing is the method of animation we chose to create out final animation scenes with. At first I experimented with applying gravity to each individual asset, I found this a long a tedious task as each individual asset must be made an Active Rigid Body and everything that I did not inted to be floating around such as chairs and walls. Secondly each asset must have an individual gravity feild meaning more time is taken up and also all the setting must be the same such as gravity strength and then the direction in which the gravity pulls the object so they dont just float upwards. I fould key framing was much easier after experimenting with it, I could simply move each asset to where I wanted it to be at that specific frame and create a key frame, Maya would then automatically create the path in which the product has to take in order to get to the location by that time. To achieve the look of slow rising, floating objects I had to make them travel a small amount of distance over a longer period of time, to make them go faster I would make them cover the same amount of dintaces in less time (frames) meaning the asset has to travel quicker to get there. As you can see in the image below, the red lines indicate where I have placed a key frame, I origionally put in a key frame every 100 frames however, I found this gave it quite a blocky overall finish and the objects moved incosistently so from this I had to place key frames more frequentley. Eventually after much trial and error for this asset I have placed key frames at frame 1, 19 ,150, 295, 299, 300, 310, 334 and 350, this is to ensure the asset floats smoothly and consisteltly with a small fluid rotation making the animation as realistic as possible.

Subscribe to:
Posts (Atom)