Wednesday, 25 November 2015
Legal Constraints
Legal constraints are rules that have to be followed by the creators/designers of in this case robot sidekick models, features such as names, body shapes and accessories of characters can be copyrighted meaning they cannot be copied into other designs I have taken inspiration from the robot Weebo from the film Flubber staring Robin Williams. As you can see many features from this robot can be seen in my design however they have been manipulated and are not identical. For example the body of the robots are both spherical however mine is a perfect sphere likewise Weebo is not in addition, My character has many accessories including 2 jet engines, a mini gun and and intake slot as a mouth compared to Weebo's flip up TV screen. Much like Weebo my character has a camera on the from however Weebo has a camera as an extra facial feature where as my characters camera is its right eye. As you can see there are many features that are relatable between these two robots however there are crucial differences in order to ensure no modifications have to be made due to legal reasons.
Monday, 16 November 2015
Enviroment Proposal
For unit 68 I must create a 3D environment
of a futuristic city, this will include a skyscraper as a main feature and
other assets such as shops, vehicles, bins, sculptures and other modern
features.
In order to create a successful 3D environment
I will ensure research is carried out before hand, from sources such as the
internet I will gather information to enhance and consolidate my knowledge of
3D design and modern environments in addition, I will collect images and photos
that can be applied to assets as textures improving the overall finish of my
work. The overall appearance I would like to achieve is sleek and clean; I will
ensure I create this look by using sharp edges, and a restricted colour pallet
of greys and blues.
When creating a 3D environment I must
consider the ethical and legal terms in which I must follow. I will be taking
inspiration from the futuristic city seen in the 1976 film Logan's Run and also the game Mirrors Edge, while
influencing my work I will ensure I don’t not break any copyright laws by creating
all my own assets from scratch that will be different shapes compared to the
original my environment will be more of a developed creation by creating my own
interpretation what I feel it should look like. Another Legal consideration
would be using others images for my textures, to avoid this situation I will
reference all my textures in my texture research as I find them.
The target audience of my 3d environment
project would be late teenagers-early adults (16-24) who are intrested in sci-fi as I feel it takes a more
mature mind to understand the complexity of a futuristic environment and really
appreciate the attention to detail that I will put in however can still enjoy
what I have created. I feel that by deciding to create a futuristic city I have
enabled myself to be very imaginative and creative with all the possibilities
of features I could include. As I mentioned earlier I would like my environment to be portrayed as very clean and sleek, I feel these features very much suit my target audience as they can be complex yet innovative with a level of class to it which I feel will be fully appreciated by the older mindset. I will ensure my enviroment appeals to sci-fi fans by following my modern sleek style, incorporating futuristic features and kepping my colour pallet to whites, blues, greys and chorme.
When creating my environment I will be using the 3D design software Maya, I will have to demonstrate a number of skills throughout the creation of the project. From past experience I have a background knowledge of the software meaning I know how to carry out tasks such as applying textures or manipulating objects meaning I can be efficient when creating my environment. Another piece of software I will be using is Adobe Photoshop, I will use this to create, edit and touch up images and textures that will be applied to assets I create in Maya, I also have past experience using this software therefore when it comes round to using it again I should be very time efficient, a major benefit of using Photoshop would be the fact i could create seamless textures which would help when applying them to large areas so the pattern can be repeated yet line up perfectly. Alongside these two pieces of software I will also need a drawing resources to sketch out my initial ideas and other designs, a computer and possibly a scanner to upload the hard copy drawings I will create and finally, a high quality camera to take images in which I can transfer onto the compute to use as textures.
Throughout this project I will ensure I use my time efficiently and effective by creating a production schedule, this will mean I have deadlines to complete a certain amount of work before ensuring I have enough time to create everything need to make a high quality 3D environment. I will liase with my client throughout the whole modelling process and seek feedbackfrom them where neccissary.
Within this proposal I have covered all aspects of the brief, that includes ethical issues, target asuience, requirements and the project as a whole. I created this document in order to throughly understand the brief meaning when it came to the creative stage I knew and understood everything I had to to and the requirements I must meet. This document is extreemly helpful to me as it is cost effective in the sense that when I came to the creation stage I would be able to minimise errors which would penulitamtley cost money to fix therefore, it is better to understand in detail what I am creating before hand. Within this document I also explained my target market, it is essential I understand what they want and need.
Within this proposal I have covered all aspects of the brief, that includes ethical issues, target asuience, requirements and the project as a whole. I created this document in order to throughly understand the brief meaning when it came to the creative stage I knew and understood everything I had to to and the requirements I must meet. This document is extreemly helpful to me as it is cost effective in the sense that when I came to the creation stage I would be able to minimise errors which would penulitamtley cost money to fix therefore, it is better to understand in detail what I am creating before hand. Within this document I also explained my target market, it is essential I understand what they want and need.
Production Log
In this first lesson we were looking for inspiration in
modern design and futuristic characters by researching images and brainstorming ideas. Below is a mood board of futuristic characters/
robots, from this I will take inspiration, I prefer the models with smoother, cleaner curves therefore I this this is what I will reflect into my initial designs.  |
For the first half of this lesson I
finished researching for
inspiration and I came up with 6 initial sketches for my robot sidekick character, this took all lesson and I did not completely finish therefore next lesson I will post my completed initial sketches page.
|
In this lesson I finished my final 2
designs and scanned them into the computer
to be inputted into Maya and finally created. As you can see below I tried to create 6 very different characters this is in order to give me the best idea of what sort of character I would like to create.
|
In
this lesson I decided on a character which was the sphere with blades on his head so it can fly. I drew a front, back and both side, I started to input my drawings into Maya however it is a lot harder than I anticipated and I spent most of is
lesson manipulating the images in Photoshop. This is my front image.
|
Today I ran into some difficulty inputting my images into Maya as the different images are not the same scale meaning they do not line up and this would be a big issue in the creation and I had to think of a solution quickly, my options were to either compromise and guess the shape of the robot and have a in precise model or redo my drawings and start again. I chose the second option as it would allow me to have an accurate model and will be more beneficial in the future as I have images to reference back to.

In this lesson I re-drew all my sketches and scanned them into the computer and as I had perviously inserted them into Maya in the past this lesson I managed to do it very quickly in addition, I started modelling 3D shapes. By the end of the lesson I have got the basic sphere and I have also modeled a jet engine in replacement to the propeller as I felt this suited the model better, I got the main shell of the jet engine by using a polygon torus that I stretched lengthways and decreased the size of the radar, I done this with another one but smaller to create and inner shell and finally to complete the outer shell I used a polygon cone and deleted the the tip to look like a small exhaust. To finish the model I use a polygon cylinder and deleted every other face to make it look like a fan, I then put a small sphere in the centre of the fan to make it look more aesthetically pleasing.

Today I have added a face and I decided to make the face for bubble bot and after I created it, it looked to friendly and a bit like a character that should be in Thomas the Tank Engine so
I change the mouth to an intake scoop where it can suck objects in and to make it look more scary and less friendly I added CCTV cameras as the eyes with some downwards pointing eye brows to make it look to fierce as shown below however I feel this gives a confused message of the robots image therefore I decided against the evil look and changed it back to the original look and continued to make the model look a bit more friendly however from this I have decided to change my target audience would be around the 5-10 years of age. I will continue to make my model with this in mind.

Today I made a mini gun to go on the bottom of my character so it can defend its self or enforce the law. I plan to make a casing for this and make it retractable inside its body and add some withs or method of stability while it is in the air.

I found this photo of a plane while researching different tail fin features, I hoped to find an imager I could take inspiration from and reflect into my model.

Here is the model with the new tail fin feature, the tail fin was inspired by the plane seen above, I recreated this by manipulating and merging different shaped polygons. As you can see it is not textured yet however I feel that the modelling side of the project is near on completion.

In this lesson I made a compartment on top of my model to allow easy access for maintenance and to ensure it is practical for the model I have added light bars when the compartment is slightly open, to open it I created a hydraulic pump as seen below, there will be 6 hydraulic pumps located on the model in pairs. Toady I also played around with textures applying different ones and highlighting other pieces of the model with different textures, the one I concluded with is displayed below.


After receiving feedback non bias responses on the model shown above, they said that the model has an estimated target audience of around 15-25, as this was not the audience I was aiming for, so to make it more appealing for the younger market I have made the model lighter and more fun by using chrome and marble textures, I also made a glass window in the top of the maintenance hatch.

In todays lesson to enhance the look of my robot I created a circuit board that can be viewed through the glass hatch on the top of my robot. I also played around with lighting for the first time changing the distance of the light from the model and the intensity of the light. I still did not get my desired result so I will continue with this next lesson.

This is my completed model with lighting and rendering.
Tuesday, 20 October 2015
Monday, 19 October 2015
Asset Mood Board

This is a mood board I created for my 3D enviroment, it was used to help me find inspiration when planing and disigning assest to put in my enviroment. This was very helpful as it ensure I could meet my target audiences requirements by adding cool features they like. It was also cost effective as it allowed me to make educated design decicions rather than plucking ideas out of the air.
Thursday, 15 October 2015
Bubble Bot

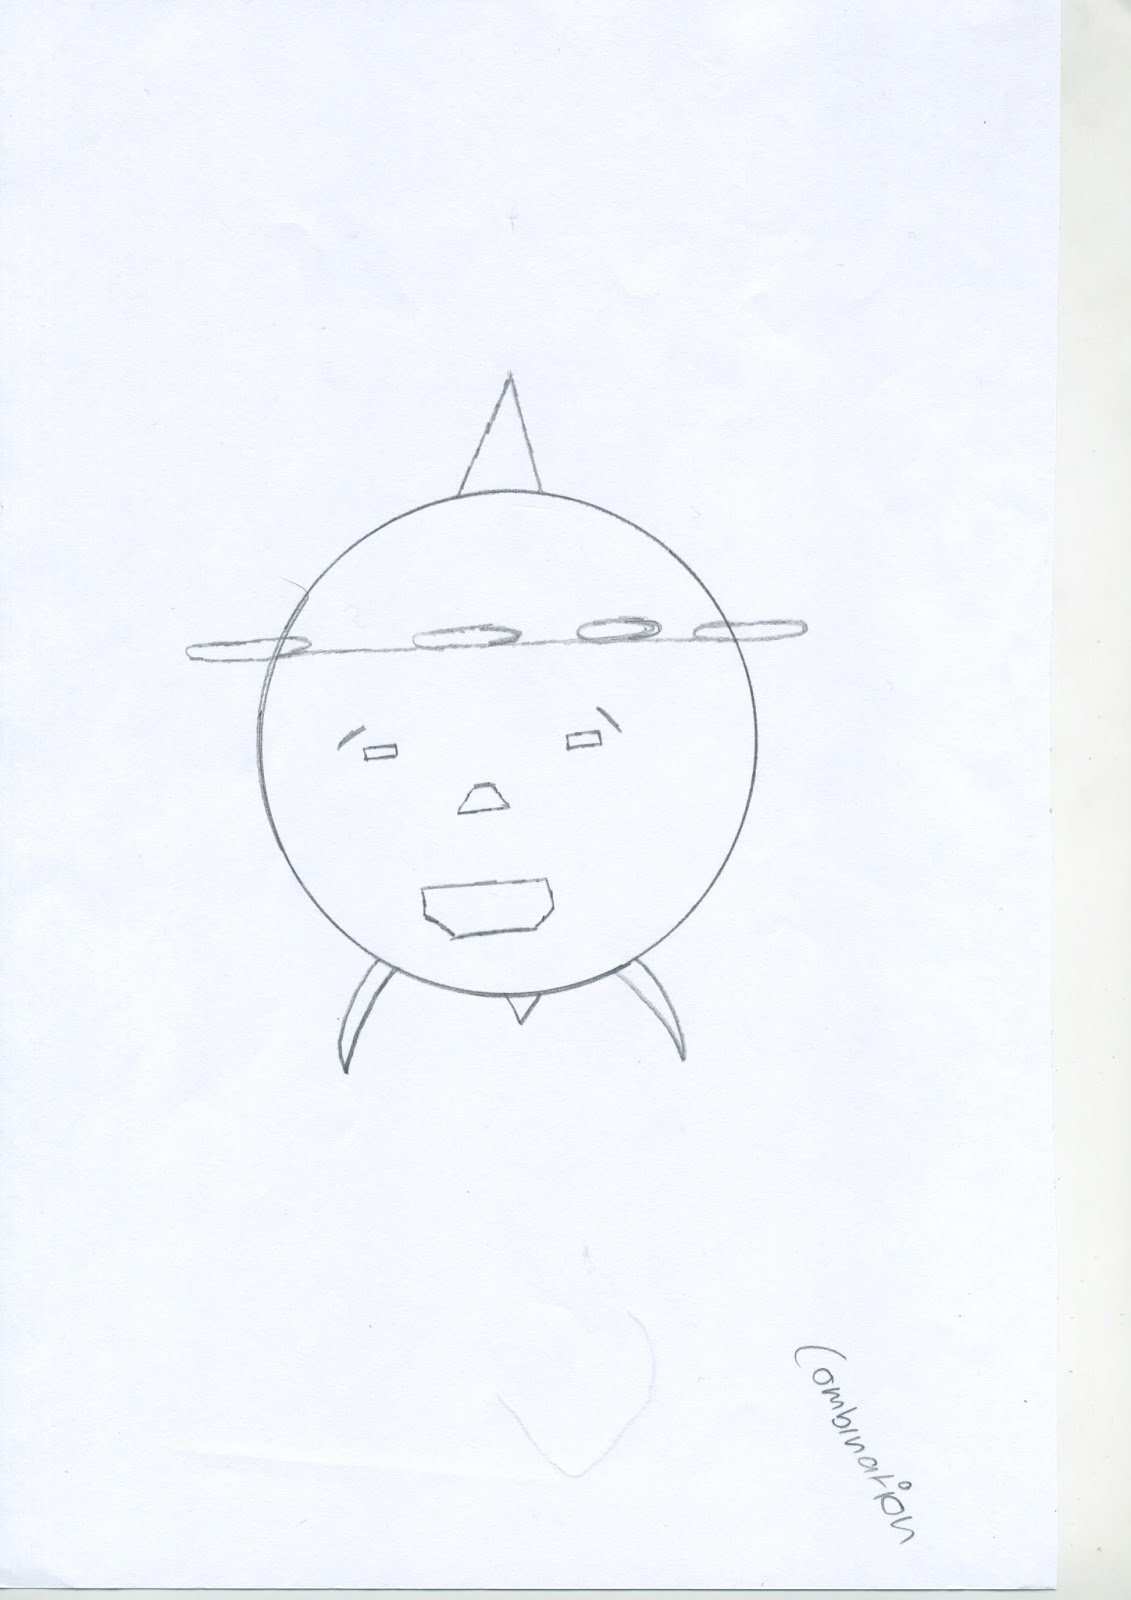
This is my page of 6 different character ideas in response to the specification of a robot sidekick. I have chosen to proceed with the bottom middle design which I have named Bubble Bot or BB for short. I chose this design as I feel it meets the specification well and combines features seen on the other robots into one design, in addition along side looking cute it is also lethal the metal blades on its head and be used to slice opponents open and its landing tripod have spikes on that can stab opponents finally, it has laser guns that raise out the side that can burn through enemies clothes and skin.
\

Thursday, 8 October 2015
Character mood board

This image here is the result of my research into futuristic characters, many trends appear when looking into futuristic characters: many characters have clean lines and look very slick, stylish and modern. I feel this has been done to represent the "ideal future" where humans and technology work hand in hand and rely on each other to fulfil tasks. In comparison another common trend is that other characters have heavy body armour and war machinery, I feel this shows a future with heavy conflict maybe with extra terrestrial beings in addition, it may show how technology has taken over and humans rely on it to carry out basic tasks.
As explained before there were two main trends with futuristic characters much like there are two main environments: utopian and dystopian. A utopian environment is on where every thing is perfect or is based on the "ideal future" in comparison to dystopian which would be an unpleasant environment that contains or shows the effects of conflict.
In my research I found that the majority of my images were dystopian showing that the general image of the future contains conflict.
Thursday, 24 September 2015
Task 6: Constraints
Constraints
Constraints are restrictions or limitations within 3D animation, a 3D animation artist must consider may constraints such as polygon count, render count and file size.
Polygon count:
Polygon count is the number of faces used to construct a shape, the higher the polygon count is, the higher quality of the image is however it will also take longer to render. Games consoles such as Microsoft's Xbox 360 can render 5000,000,000 polygons per second in comparison to Sony's PS3 which can manage just over half that at 275,000,000 polygons per second. These consoles allow users to play games however they need to render at 30 frames every second at minimum and consequently the on screen polygon count drops to 16.6 million for the Xbox 360 and 9.1 million for the PS3.
As you can see below this is the process of adding more faces to a 3D model, the blue mugs are simply coloured and rendered images of the skeleton model above, the last model on the right is very smooth and most realistic as it has the most faces and therefore would take the longest time to render, I will explain more about this in the paragraph below.

Render time:
Render time is how long it takes to generate an image from a 2D or 3D image. As I mentioned before the higher the polygon count, the longer an image will take to render. To give you a perspective of how long rendering takes, a single second from Toy Story 3 would have taken 384 hours to render! This is due to the fact it has a high polygon count. It is important to ensure the frame rate is high as the higher the frame rate the better the quality. In gaming anything under 30 frames per second is noticeable to the player meaning the will have a negative experience of the game.

This image shows a model before and after it has been rendered.


File size:
File size is a restraint from many reasons, one being the file must be saved somewhere and if it is a very large file such as a game or video. An alternative would be saving it to a disk or even to the cloud however if the file were to big it would not be able to be played on the devices it was created for. Some games come as two disks, one for downloading content the other to play. To continue the quality of the game also relies on the space available on the ram. This is because the content of disk one of two is stored on the ram for easy access. The more space on the ram the better quality the gaming experience is as features such are draw distances will be of a high quality. Below are two images of game play in which the full content has not downloaded, this is often known as lagging and is caused by the size of the file and therefore it takes longer to be processed and then displayed on the screen.

Task 5: 3D Development software
Different softwares
Maya

Maya

Maya is a 3D modelling and animation software program that allows the user to create full-motion effects. This software is know for its realistic laws of physics and the effects and actions on the characters. Also Maya is one of the most user friendly programs that allows the user to create very realistic videos, another strength is that effects such as smoke and falling water that looks as if it were real can be created in Maya. To add to the realism of the software characters created can also be given emotions that are portrayed through body language and facial expressions. Being such good software companies such as Tata. PK and General Compression have used it to create games and characters.

3D Studio Max

3D Studio Max was created by Autodesk and it is software that allows the users to create 3D designs such as cars and games/film backgrounds. This software is used mainly by film makers, game developers and graphic designers. 3D Studio Max was used to make parts of the new Alice in Wonderland film and Assassins creed. This software is available to students for free however the actual company that makes 3D Studio Max are looking for people with experience of using the software so they can design things for them.

SketchUp
SketchUp is also a 3D modelling software however SketchUp specialises in architecture, interior design games and film. This software was designed with simplicity in mind, it is easy to use and the software its self is £469 (for the pro edition) other wise you can get the standard SketchUp Make for free.

Lightwave 3D
Lightwave is again 3D modelling software however this was first created 20 years ago meaning it was one of the first 3D modelling software ever. Lightwave specialises in static and animated 3D models. This software is aimed at dedicated major studios as it is so advance from all the other 3D modelling software due to the face it has a custom pipeline. Lightwave is $995 per copy, it was used to model the Aston Martin DB5 and helped create scenes in the 2012 James bond movie Skyfall.

Cinema 4D

Finally cinema 4D is also 3D modelling software, know for its animation and rendering abilities this software can reflect life like details into models with a user friendly interface with a little practice can be used by all. It is also know for realist collisions between objects and its quick rendering speed due to the face it uses the computers network efficiently. This software was used to help create the film Prometheus.

Task 4 Mesh Construction
This presentation is about mesh construction, it explains 2 different forms of modelling, describes what primitives are and gives a brief overview of mesh construction.
Here is also the link to the presentation as the embedded presentation sometimes disappears:
http://prezi.com/tz5gg0etyp_b/?utm_campaign=share&utm_medium=copy&rc=ex0share
Tuesday, 22 September 2015
Task 3: Geometric Theory
Geometric theory:
A geometric polygon is a shape or model that covers all X, Y and Z coordinates, this means the shape or model will have: vertices, edges and faces. NURBS and polygonal models are the two main geometric theories used in 3D modelling.


Polygonal models:
This form of modelling is created with vertices, edges and faces, It is mainly used in games, film and animation, this is because these models are easy to manipulate and have a high quality end result.
Meshes:
A mesh is is what makes the model, when all the vertices, edges and faces are joined up a mesh is formed, the mesh is a surface created by joining these three up.

Vertices:
Vertices (plural of a vertex) are practically the corner of a shape or surface, at this point a coordinate is given to later plot and be joined by edges and faces creating a shape.
Edges:
These are used to join vertices together, once these has been added the skeleton of the model is made.
Faces:
Finally faces are what turn a skeleton model to an actual model, these join the edges together and they can have their colour or transparency changes to suit the models design or function.
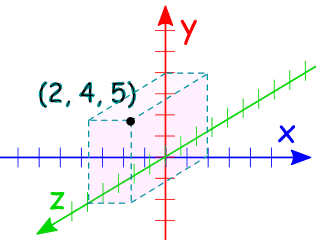
 Cartesian co-ordinate system:
The Cartesian co-ordinate system works using the X, Y and Z axis, it allows 3D models to be created by giving each vertex a 3D co-ordinate as shows in the image below.
A geometric polygon is a shape or model that covers all X, Y and Z coordinates, this means the shape or model will have: vertices, edges and faces. NURBS and polygonal models are the two main geometric theories used in 3D modelling.
NURBS surfaces:
These are created by the software generating a smooth face joining two or more curves, these curves are very accurate and therefore used in the development of automotive design and also engineering. 

Polygonal models:
This form of modelling is created with vertices, edges and faces, It is mainly used in games, film and animation, this is because these models are easy to manipulate and have a high quality end result.
Meshes:
A mesh is is what makes the model, when all the vertices, edges and faces are joined up a mesh is formed, the mesh is a surface created by joining these three up.
Vertices:
Vertices (plural of a vertex) are practically the corner of a shape or surface, at this point a coordinate is given to later plot and be joined by edges and faces creating a shape.
Edges:
These are used to join vertices together, once these has been added the skeleton of the model is made.
Faces:
Finally faces are what turn a skeleton model to an actual model, these join the edges together and they can have their colour or transparency changes to suit the models design or function.

The Cartesian co-ordinate system works using the X, Y and Z axis, it allows 3D models to be created by giving each vertex a 3D co-ordinate as shows in the image below.
Task 2: Displaying 3D polygon animations
This Prezi presentation displays the 9 steps of the graphics pipeline, these steps include: modelling, lighting, viewing, projection, clipping, viewport transformation, scan conversion, texturing and shading and display.
<iframe id="iframe_container" frameborder="0" webkitallowfullscreen="" mozallowfullscreen="" allowfullscreen="" width="550" height="400" src="https://prezi.com/embed/ugl63ekjk24d/?bgcolor=ffffff&lock_to_path=0&autoplay=0&autohide_ctrls=0&landing_data=bHVZZmNaNDBIWnNjdEVENDRhZDFNZGNIUE43MHdLNWpsdFJLb2ZHanI0OUQrQ1IzZFRSbWxGamQxb1pIUnhFazJnPT0&landing_sign=X9MZUmY3i2Dtf0asoFZ_FBT3yoWRW7QnSy5-O32Z1-M"></iframe>
Here is task two of displaying 3D polygons and animations, this presentation will describe the following processes: Rendering, Rasterisation, ray tracing and radiosity.
Thursday, 10 September 2015
Task 1: Applications in 3D
Applications of 3D
There are many ways the uses of 3D technology can be applied to every day life and through this blog I will explain further into the science behind 3D and how it is adapted to suit and benefit different industries. 3D technology is an image or model being displayed over 3 dimensions hence 3D meaning the user can see depth, this effect is to make the model look as if were real.


Gaming industry


Product design industry
3D design is useful in the modern as it can be used to save time, this is because before 3D design software was invented a 3D prototyped wound have been hand crafted which is very time consuming however with 3D software, minor adjustments can simply be changed in a matter of seconds rather than having to reconstruct a whole new model. After the model has been designed it can be 3D printed, from there final last touches and adjustments can be made before a product is produced.


Applications of 3D in medicine
3D has had a big impact on medicine in many ways, one way is false limbs, by using 3D technology 3D limbs can be constructed using 3D technology and also can be 3D printed. Also procedures such as mammogram can produce a 3D image used to diagnose patients with cysts and lumps, the 3D image will allow the doctor to see the size and therefore severity of the cyst.


There are many ways the uses of 3D technology can be applied to every day life and through this blog I will explain further into the science behind 3D and how it is adapted to suit and benefit different industries. 3D technology is an image or model being displayed over 3 dimensions hence 3D meaning the user can see depth, this effect is to make the model look as if were real.
Film industry
3D is used to create images that
appear to be “coming out of the screen” 3D films are very common now. For a 3D
image/film to be made, each eye has to see a slightly different image which the
brain then interprets and merges it so we see an image with depth. As shows
below the 3D image is made when wearing glasses as each eye of the glasses only
lets an image through if its either vertical or horizontal ( one eye lets in
one or the other ) Lenticular works the same however it is in black and white
as it is a red and blue. One example of one of the most iconic 3D films is Avatar, this film at the time was the most expensive film to make and creatively used 3D to make box office record breaking film.


Gaming industry
Many modern games that are released are
now 3D. The science behind it is very similar to films however there are device
made such as the Nintendo 3DS the first handheld 3D gaming device that does not
require glasses however this trend has not continued. Many games are now in 3D
such as: Need
for Speed: Shift,
Call
of Duty: Black Ops,
Battlefield
Bad Company 2
and Tomb
Raider Underworld. Super Mario is a game that displays a transition from 2D to 3D gaming, this can be seen in early Mario games with 2D backgrounds and a 2D Mario to the modern day Mario games with far more complex 3D backgrounds and characters. Another feature that has changed is the interaction required from the player to complete the game, due to consoles such as the Nintendo Wii and games such as Mario Kart a 3D background comes as standard on almost every game now. A visual example of this can be seen below, this image displays the first Mario and the most recent Mario and the evolution of the graphics, detail and the added dimension.


TV Industry
Samsung is the most common manufacturer
in 3D televisions. 3d TV’s are very expensive pricing in at over £850 for a 55”
TV. According to statistics in the UK only 1 in 10 people us their 3D TV.
Company's such as sky have a whole channel dedicated to 3D however there is a
limited choice as it only shows football matches, documentary's and films. One example of a 3D TV show is Darren Brown's 3D magic spectacular.


Product design industry
3D design is useful in the modern as it can be used to save time, this is because before 3D design software was invented a 3D prototyped wound have been hand crafted which is very time consuming however with 3D software, minor adjustments can simply be changed in a matter of seconds rather than having to reconstruct a whole new model. After the model has been designed it can be 3D printed, from there final last touches and adjustments can be made before a product is produced.


3D in web design
3D can be used in web design in many
different ways, one of a
3D feature is
holographic text. This effect is created by adding depth to the 2D text after
the user scrolls over it, this is a very effective/interactive feature that
could attract more users to the website.

3D has had a big impact on medicine in many ways, one way is false limbs, by using 3D technology 3D limbs can be constructed using 3D technology and also can be 3D printed. Also procedures such as mammogram can produce a 3D image used to diagnose patients with cysts and lumps, the 3D image will allow the doctor to see the size and therefore severity of the cyst.


3D applications in Education
3D has had a big impact on learning in education, through the use of DLP (digital light processing) technology 3D projectors can be used to enhance students learning. 3D enables students to see images such as cells in different ways. Typically a 2D image would be shown however being a cell this is an object that many people will never see in real life and this is why 3D is important. The student will be able to view a cell from all angles enhancing their learning experience. This can have a big impact on learning and education as the image will be precise and enhance their learning as it will be a more realistic experience.


3D has had a big impact on learning in education, through the use of DLP (digital light processing) technology 3D projectors can be used to enhance students learning. 3D enables students to see images such as cells in different ways. Typically a 2D image would be shown however being a cell this is an object that many people will never see in real life and this is why 3D is important. The student will be able to view a cell from all angles enhancing their learning experience. This can have a big impact on learning and education as the image will be precise and enhance their learning as it will be a more realistic experience.

Subscribe to:
Comments (Atom)