The brief of the assignment is to create an anti-gravity animation. The scene will be as normal until for the first time in the game the gravity will all of a sudden turn off causing objects to suspend in the air and float around creating wonder for the audience. All the objects will be related and suit the theme of the game. I took inspiration from the films Total Recall, Inception and The Simpsons anti-gravity scenes as I found them particularly effective due to the small details which I have tried to reinterpret in my own way within my 3D animation, I particularly like how the chips rotae in the air in the simpsons clip.
As seen in my animation I have created: a space helmet, a pair of space boots, a Lego figurine, a coffee cup and a torch. I chose these items as I thought it was likely for them to be found in a space ship and therefore all related in some way. I initially sketched these to have a hard copy of how I would like them to look I found this very helpful as it ensured I got all my ideas down before I moved on to the next asset. Despite being useful when it came to the modelling stage in Maya I was not able to create some of the assets such as the camera as the shape was simply to complex therefore, masking it very time consuming to make. Due to the fact I have a deadline I made the other assets first however, I didn't have time to go back and finish it in the level of detail that I wanted it therefore, I didn't feature it in my animation. Through the planning process I feel it would have been easier to make mock models instead of sketches as it would have helped me gain a rough idea of the shapes and tools I could use when it comes to making different assets which require different skills I have not learnt before meaning I would not have wasted time on assets such as the camera.
My original plans did not change much through the planning to modelling process, My torch and Lego figure staged exactly the same, I changed the space helmet and boots so they looked more like a set, I did this by colour coordinating them with each other and the colours I used mean they also match the inside of the spaceship. I swapped the camera for a photo frame, after making it I decided that I would make the stand hinge onto the back to make it look more realistic when floating. I also made the coffee cup more realistic by adding a card texture and a realistic lid. These amendments helped me meet the brief as it looks more effective and this created wonder and excitement for the audience which is what I aimed to do as it enhances their experience.
My torch and Lego figurine were modelled exactly as planned and I am very happy with the outcome. I changed the design of my helmet after making a rough design in Maya, I made the transparent window at the front a bit smaller so it could sit in then helmet and it can flip up into the helmet, I feel this adds to the design and makes it look more aesthetically pleasing. My space boots were not originally meant to be included in my animation, I made them when I was practicing space gravity and I felt that they followed my theme and suited the style of the spaceship therefore I added them to my animation. The one design that changed the most was my photo frame, this asset replaced the camera that I decided not to include, at first is was simply a wooden frame however I gave the frame itself more shape by dragging out the corners making it look very modern and I also made a stand to hold the photo frame up however as the design process went on I decided to make the stand a hinge which will slowly flap up and down as the frame is flying off.
To create the modern edges I selected the vertex or opposite corners and dragged them out creating a curved edge that looks very sleek. To create the hinge on the photo frame I used Booleans and Difference, I first made my stand then created 2 polygon cubes and used Booleans to create the teeth of the hinge in my stand, while this tool was very effective there are different ways you can cut/merge them this meant I had to do alot of experimenting and trial and error while using the tool before getting the hang of it, also the object you select first makes a difference as which shape is going to create the intersectino in the other shape, this is all what I had to learn in trial and error. To create the torch I used a variety of tools but most importantly I used the face selection tool which allowed me to enlarge certain faces enabling me to create shapes such as the cone on top of the torch. I also used the merge tool allowing me to combine polygons, I used this tool to create the helmet, this tool was very useful however when I merge two objects the pivot point changes meaning if I dont reset the pivot point to the centre of the new shap it will enlarge or move from the point. Finally I used the UV Mapping tool when applying the texture I created to my space helmet, I ensured that the buttons and the flags were located in the correct place in the right proportion by editing the position and proportion in the UV Mapper, while UV Mapping I found that the NASA logo I originally intended to feature on the space helmet did not fit to the correct scale or proportion when fitting the texture, I did not want this to decrease the quality of the asset and as a result I did not feature it in my design.
The first asset I am particularly proud of is the coffee cup as this is the first model where I had planned to use Booleans in advanced as I had never planned to use this tool when creating a piece of work that would contribute towards my course work which lead to the final result of this asset being one that I see as a special achievement as it is a tool I learnt how to use myself in my own time which I was then able to reflect into my graded work, I also feel that the overall result of this model is very realistic and easily recognised as a coffee cup. The second asset I am very proud of is my Lego figure, I was proud of this as it was one of the most time consuming assets to make and I feel my finished model looks very much like a Lego figure you could pick up on a shop shelf. The final asset I am extremly proud of is my photo frame, this is because I came up with my own design for the hinge that would hold the stand on the back up which was successful, this allows the stand on the back of the photo frame to float up and down while the photo frame itself is floating making it more realistic, I also used my own photo from my skydive I did previously in the year.
When choosing my textures I mainly had to consider my target audience as at the end of the day they are the people who will be seeing them the most and the people I must make them appeal to. Bearing in mind my target audience is teenagers (13-19 year olds) I wanted to make it look classy to appeal to the upper end of the target audience yet bright so it appealed to the lower end, I chose a very bright shiny gold and a deep navy blue, these colours link very well when put together and I feel the final result is very classy yet appealing therefore meeting the specification of my target audience. I also had to ensure the textures I used would link into the theme of space which is why even on the space helmet and booths I features gold and blue stripes to tie them into the scene. I feel next time I could use a wider variety of textures to break up my scene a bit more.
First I planned what I was going to make by sketching my initial ideas on paper, I felt this was good as it allowed me to draw my interpretation of an object however I am not the best at drawing therefore this process possibly would have been more effective if I could have researched images of different forms or styles of that chosen asset. Secondly, I made a mood board of the colours I wanted to use and related items along my theme. I then started to create my selected assets in Maya finally, texturing them and animating them, I feel that the process after the sketches was very effective and easy to manage time. Following on from the planning process I created a master scene (spaceship interior) and in seprate files I created the assets in Maya ensuring I textured them along the way and werging the finished asset into 1 shape. I then placed all the sepreate assets into my masterscene and then animated the scene.
Key framing was an essential part of the creation of my animation, it allowed me to ensure the motion of the assets floating was consistant and fluent however, this took some practice so I experimented on random polygons/models I created to get more of a solid knowledge of how to use key frames to enhance the feel of my animation. I started by selecting the first frame, I then moved the asset to where I wanted it to start from, in this case it was the table in my space scene. I then moves the frames on to 50 for example, the asset is then moved to where I would like it to be at that frame, to make it move fast I would make it go a longer distance in less time (less frames) or to make it go slower I would make it travel the same distance but allow it more time (more frames) to do so. After it is moved to where I want it to be at that specific frame I set another key frame by clicking 'S' I continued to do this and a big benefit to key framing was I could see where the other assets were at the desired frame meaning I could make the asstet im woking on float up to the same hight in the same amount of frames giving the effect of the floating consistant. A major drawback for key framing was my asstet with a pivot point (the photoframe) In order for the stand to be in the same place when floating I had to merge it with the rest of the frame so it would mirror its movements and rotation in the air however once in place I had to un merge, change the pivot point and then move the stand outwards so make it look like its floating on its hinge however, once un merged then merged back together it became a new object therefore the old keyframes were no longer in place and therefore the photoframe would simply be in on position in the air from start to finish, obviously this is not the desired finish. As a result I had to key frame the photoframe and the stand seperatley but make the pivot point of the stand where the stand and photoframe join making the finished product a photoframe with a swinging stand as the rest of it floats up.
I feel that my technical skills in Maya have majorly advanced considering at the begining of the corse this was new software for me to learn. I feel I am particularly good at modelling and this is something I really enjoy doing, Over the past months I have learnt a variety of different tools and built up my modelling skills, I particularly enjoy designing and modeling products and other objects. I feel I the area witin Maya I could improve upon is animating as this is the area I have spent the least amount of experience with. In the future I wish to build up a wider knowledge of the tools avalible in Maya and be capable of more chalenging tasks.
I feel that throught this project I have kept to my scedule very well and that I have stayed on track, the main reason for this was because I stuck to my production scedule, I also feel I made a good decision by leaving the creation of the camera till last and finishing it if I had time rather than waiting untill I finished it then rushing my other assets, this ensured I could finish the scene to the high quality I wanted.
Overall I am very pleased with my final outcome and I feel it fits its purpose well doe to all the consideration and effort I put into it. I feel that the animation has exceeded my expectation as the only time I had animated in Maya was in my own time on personal projects meaning this is the first time that I am being asses on my animating skills, I am very proud of the result. Personally I felt that modelling the assets was my strongest skill in this unit although i am very please with how the objects float around the sectioned of room although , I feel that I could have used the space more effectively in my animation as the primary scene is located in the captains quarters which is separated from the rest of the spaceship via a glass wall, in the background there are not floating objects which in real life could be plausible however very unlikely so if I could make any improvements I would add some floating assets in the background.
Wednesday, 28 September 2016
Thursday, 22 September 2016
Animation Proposal
The
brief of the assignment is to create an anti-gravity animation. The scene will
be as normal until for the first time in the game the gravity will all of a
sudden turn off causing objects to suspend in the air and float around creating
wonder for the audience. All the objects will be related and suit the theme of
the game. It is called The Last Voyage.
I have made 6 assets that will float around the spaceship interior, the first asset will be a space helmet, this will be white and feature a Great Britain flag (nationality of the astronaut) it will also feature two nobs that will control the oxygen flow. My second asset will be a pair of space boots, they will be colour coordinated with the helmet and will be placed next to/near the helmet in the space ship. In addition, I will also make a spray paint can, this is so the astronauts can repair flaws in the spaceship, I will texture the can with a label and ensure it looks realistic by making the top and bottom of the can the colour of the paint, I will not give it a lid as the nozzle makes is almost instantly recognised as a spray paint can where as a with a lid it could be mistaken for something else such as deodorant or industrial glue. Furthermore, I will include a Lego figurine, this will be a novelty mascot belonging to one of the astronauts, this will be yellow red and blue (typical Lego colours). I will also include a torch; this will simply be black with a green and red on and off switch. My spaceship will also feature a take away coffee cup, which will simply be white and cardboard. Finally I will include a wooden photo frame with a stand connected by a hinge. My spaceship will be very luxurious, I will create a separate cabin where the pilot and 2 co-pilots will sit, this is where all my assets will float, there will be more debt to the spaceship but this will simply be for aesthetics. In the pilots cabin there will be 3 big luxurious chairs and a control desk.
My first major legal and ethical consideration would be the Lego figurine firstly, because Lego is copy righted meaning it would be illegal for me to use it without Legos permission which would usually come at a high cost secondly, if I were to recreate a figure similar to avoid any legal constraints I would be playing God as it would be my perspective of how the body similar to humans should look which may offend people of specific cultures. To overcome this issue I will contacted Lego and they have given me permission to use their name. There is a risk of copy right meaning I have to be careful that I do not copy any assets I have seen in other games or films, to combat this issue I have ensured that all of my assets have an original design that I created.
The target audience for this game would be 13-18 year olds firstly, because of the sci-fi genre, most adults would accept the reality that it is highly un-likely that they would every go to space and experience zero gravity however as a teenager especially in the first few year this still may be a hope they wish will become a reality therefore they will particularly engage with the game. To appeal to my target audience I have used appropriate colours (gold and blue) to texture the interior of the spaceship so it will not look too bold yet dull. I have also modelled assets that will appeal to them such as the Lego figure in addition, I will make my scene sci-fi by setting in in a futuristic spaceship, to achieve this look and appeal to sci-fi fans I will make my spaceship very sleek with sharp edges, it will be very spacious and use appropriate colours, these will be gold and metallic dark blue.
Firstly I will create the space ships interior, since this does not have to be very complex I will not need to use many advanced tools so I will simply use the manipulator, the merge tool and possible face selection. The second step would be modelling my assets, here I will use the vertex selection tool to create complex curves, I will also use Booleans to create advanced models. I will also use the UV mapper to ensure that my textures fit the model and the right proportion, I will also use Adobe Photoshop to create some of my own textures if I cannot find what I am looking for. Finally I will use the pivot point tool to change the pivot point when creating objects such as a hinge.
To complete this project I will require a background knowledge in this field therefore I will research other games and films that have antigravity scenes to see different interpretations and build my own perspective of what it should look like. I will also require a computer with modelling software downloaded ensuring I can digitally model all my assets.
Thought this project I will have to manage my time carefully as there is a lot of individual tasks I must complete thought the unit including research, modelling and animating. I will manage my time by creating a Gantt chart ensuring I spend the correct amount of time on each task however I will leave a small amount of overflow time in the unlikely event of unexpected errors or challenges.
Thursday, 15 September 2016


Thursday, 8 September 2016
3D Animation Production Journal
08/09/2016
In todays lesson I have created my spaceship interior equipped with a centre column, 3 chairs, 6 tables and a control pannel. I have used the extrusion tool to create the centre column, I have textured most of the interior and I have used the transparency tool in the texture settings to create a dividing window.

13/09/2016
In this lesson I completed 2 assets and started a third. I created a torch, a space helmet and an aerosol can. When creating the torch I extruded a sphere to create a lightblub and I also extruded and rectangle to create an eurganomic on and off button, to create the body I simply deleted faces of objects and merged them. The helmet was a bit more complex as I created my own texture in Photoshop using shapes and images off google, I did intend for the back of the helmet to have the Nasa logo on however due to the shape of the helmet and texture I could not get it to fit without it being the correct shape so I made colour cordinated colour strips to make the helmet match the interior of my spaceship. To create the aerosol can I dinply merged shapes however I still need to add textures which I intend to do next lesson.


15/09/2016
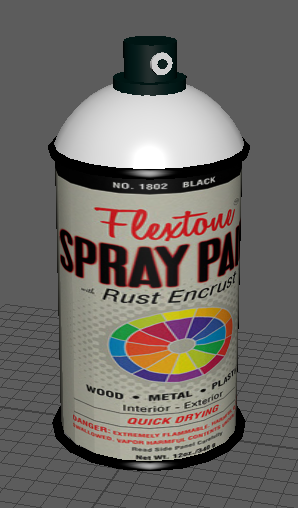
At the start of todays lesson I finished my spray paint aerosol can by texturing it, the finihsed product is shown below, I did intend for the dome underneth the nozzel to be black like the colour of the paint however if I did this you cannot see where the nozzel finishes and it looked like one shape so I made it white and I feel this enhanced the look of the spray can.

 Today I also created a coffee cup that I can put on the tables or desks, I used the face selection tool to select all the faces at the top of a cylinder and expanded it to make the cup slant outwards as it got taller, I dont the same with the lid however to created the slanted dip in the lid and the hole that you sip the content out of using Bevel and Difference.


 20/09/2016
As shown above I also stared to create a Lego Figure, I created the head by creating a sphere and reducuing the amount of divisions on it making it more the shape of a Lego head. I created the arns by merging cylinders and spheres then to connect it to the body I selected the faces and dragged them into the body. To create the rest I used the merge tool after manipulating different polygons into the shape i needed them using the extrustion tool.
 This is mty completed Lego figure. While texturing this asset I ran into the issue of texturing the body (red area(chest and arms)) the texture was not large enough to cover the whole body so I had to sample the colour in Adobe Photoshop and make a plain red texture so the whole body matches and looks correct.
22/09/2016
Photo frame
In todays lesson I created a photo frame, as you can see. I created it by using the manipluator tool and lots of merging, I also added a slight curve to the frame by selecting the one vertex in the top left corner holding shift and selecting the other in the bottom right, I then dragged these out so the were the same length, I feel this adds a cretian appeal to my photo frame. When it came to texturing I added the wood texture I found online and for the image in the photo frame I selected one from my personal album from a skydive I did over the summer I the simply adjusted it on the UV Editor to it ffit inside the photo frame. I wanted to add a pivot poing into my frame where the stand hinges onto the frame, after some research I did not come up with a sloution therefore I had to be creative and think of one myself. As seen in the second image below I added a pivot point into the photo frame where the stand joins the frame. I done this by creating teeth on both sides and then adding a bar through the middle joining the two.


13/10/16
I have currently created all my assest and textured them, I have imported all my assest into the master scene (spaceship interior) I thenstarted the animation process. Firstly I poistioned all of my assets whereI wanted them in my masterscene, I then had to make my background (the polygons that I will want to saty still) Active Rigid Bodys, I done this in FX mode of Maya, Then one by one I animated each asset, Firstly I made the object and Active Passive body, I then applyed gravity to the object, so the object floated instead of falling I made the strength of the gravity 0.25 instead of 9.8 (standard on earth) and changen the direction so the object essentially was pulled up instead of down, with this done I could then change the direction so the objects floated around the room. objects such as my photo frame was split into two objects (the stand and the photo frame) I applied a gravity feild to each of them so the stand moves on a pivot point and as a whole the photo frame rotates in the air. The more assests I animated I found the scene as a whole became alot more laggy, this was a big problem as I couldnt see my assests float smoothly and therefor couldt adjust the strength or direction accordingly, to resolve this problem I tried deleting the assets history to free up some space however this only resolved the problem slightly and it still lags. To resolve this problm I have had to re-design my spaceship, as you can see in the image below my new spaceship is alot more simple with less features such as tables and chairs, this is so I could work and be time effective as my scene no longer lags. This was a minor hick-up as i did have to re-import all my assets however the final result made it woth it.

Key Framing is the method of animation we chose to create out final animation scenes with. At first I experimented with applying gravity to each individual asset, I found this a long a tedious task as each individual asset must be made an Active Rigid Body and everything that I did not inted to be floating around such as chairs and walls. Secondly each asset must have an individual gravity feild meaning more time is taken up and also all the setting must be the same such as gravity strength and then the direction in which the gravity pulls the object so they dont just float upwards. I fould key framing was much easier after experimenting with it, I could simply move each asset to where I wanted it to be at that specific frame and create a key frame, Maya would then automatically create the path in which the product has to take in order to get to the location by that time. To achieve the look of slow rising, floating objects I had to make them travel a small amount of distance over a longer period of time, to make them go faster I would make them cover the same amount of dintaces in less time (frames) meaning the asset has to travel quicker to get there. As you can see in the image below, the red lines indicate where I have placed a key frame, I origionally put in a key frame every 100 frames however, I found this gave it quite a blocky overall finish and the objects moved incosistently so from this I had to place key frames more frequentley. Eventually after much trial and error for this asset I have placed key frames at frame 1, 19 ,150, 295, 299, 300, 310, 334 and 350, this is to ensure the asset floats smoothly and consisteltly with a small fluid rotation making the animation as realistic as possible.

In todays lesson I have created my spaceship interior equipped with a centre column, 3 chairs, 6 tables and a control pannel. I have used the extrusion tool to create the centre column, I have textured most of the interior and I have used the transparency tool in the texture settings to create a dividing window.

13/09/2016
In this lesson I completed 2 assets and started a third. I created a torch, a space helmet and an aerosol can. When creating the torch I extruded a sphere to create a lightblub and I also extruded and rectangle to create an eurganomic on and off button, to create the body I simply deleted faces of objects and merged them. The helmet was a bit more complex as I created my own texture in Photoshop using shapes and images off google, I did intend for the back of the helmet to have the Nasa logo on however due to the shape of the helmet and texture I could not get it to fit without it being the correct shape so I made colour cordinated colour strips to make the helmet match the interior of my spaceship. To create the aerosol can I dinply merged shapes however I still need to add textures which I intend to do next lesson.


15/09/2016
At the start of todays lesson I finished my spray paint aerosol can by texturing it, the finihsed product is shown below, I did intend for the dome underneth the nozzel to be black like the colour of the paint however if I did this you cannot see where the nozzel finishes and it looked like one shape so I made it white and I feel this enhanced the look of the spray can.


As shown above I also stared to create a Lego Figure, I created the head by creating a sphere and reducuing the amount of divisions on it making it more the shape of a Lego head. I created the arns by merging cylinders and spheres then to connect it to the body I selected the faces and dragged them into the body. To create the rest I used the merge tool after manipulating different polygons into the shape i needed them using the extrustion tool.

22/09/2016
Photo frame
In todays lesson I created a photo frame, as you can see. I created it by using the manipluator tool and lots of merging, I also added a slight curve to the frame by selecting the one vertex in the top left corner holding shift and selecting the other in the bottom right, I then dragged these out so the were the same length, I feel this adds a cretian appeal to my photo frame. When it came to texturing I added the wood texture I found online and for the image in the photo frame I selected one from my personal album from a skydive I did over the summer I the simply adjusted it on the UV Editor to it ffit inside the photo frame. I wanted to add a pivot poing into my frame where the stand hinges onto the frame, after some research I did not come up with a sloution therefore I had to be creative and think of one myself. As seen in the second image below I added a pivot point into the photo frame where the stand joins the frame. I done this by creating teeth on both sides and then adding a bar through the middle joining the two.


13/10/16
I have currently created all my assest and textured them, I have imported all my assest into the master scene (spaceship interior) I thenstarted the animation process. Firstly I poistioned all of my assets whereI wanted them in my masterscene, I then had to make my background (the polygons that I will want to saty still) Active Rigid Bodys, I done this in FX mode of Maya, Then one by one I animated each asset, Firstly I made the object and Active Passive body, I then applyed gravity to the object, so the object floated instead of falling I made the strength of the gravity 0.25 instead of 9.8 (standard on earth) and changen the direction so the object essentially was pulled up instead of down, with this done I could then change the direction so the objects floated around the room. objects such as my photo frame was split into two objects (the stand and the photo frame) I applied a gravity feild to each of them so the stand moves on a pivot point and as a whole the photo frame rotates in the air. The more assests I animated I found the scene as a whole became alot more laggy, this was a big problem as I couldnt see my assests float smoothly and therefor couldt adjust the strength or direction accordingly, to resolve this problem I tried deleting the assets history to free up some space however this only resolved the problem slightly and it still lags. To resolve this problm I have had to re-design my spaceship, as you can see in the image below my new spaceship is alot more simple with less features such as tables and chairs, this is so I could work and be time effective as my scene no longer lags. This was a minor hick-up as i did have to re-import all my assets however the final result made it woth it.

Key Framing is the method of animation we chose to create out final animation scenes with. At first I experimented with applying gravity to each individual asset, I found this a long a tedious task as each individual asset must be made an Active Rigid Body and everything that I did not inted to be floating around such as chairs and walls. Secondly each asset must have an individual gravity feild meaning more time is taken up and also all the setting must be the same such as gravity strength and then the direction in which the gravity pulls the object so they dont just float upwards. I fould key framing was much easier after experimenting with it, I could simply move each asset to where I wanted it to be at that specific frame and create a key frame, Maya would then automatically create the path in which the product has to take in order to get to the location by that time. To achieve the look of slow rising, floating objects I had to make them travel a small amount of distance over a longer period of time, to make them go faster I would make them cover the same amount of dintaces in less time (frames) meaning the asset has to travel quicker to get there. As you can see in the image below, the red lines indicate where I have placed a key frame, I origionally put in a key frame every 100 frames however, I found this gave it quite a blocky overall finish and the objects moved incosistently so from this I had to place key frames more frequentley. Eventually after much trial and error for this asset I have placed key frames at frame 1, 19 ,150, 295, 299, 300, 310, 334 and 350, this is to ensure the asset floats smoothly and consisteltly with a small fluid rotation making the animation as realistic as possible.

Production Scedule of 3D enviroment

I created a production schedule the help the project run smoothly and efficiently I used this document from start to finish to ensure all the mini deadlines were kept to meaning once the final day came the project was finished. It was extremely helpful as if I did not meet a mini deadline I was aware and able to catch up so the process was not delayed. Again this is very cost effective and missing a release day would have a lot of negative outcomes including, loss of loyal customers and possible sales, by ensure the deadline is met this problem is resolved. This also ensure my target audience get the game on time and finished to a high standard.
Anti Gravity Starter Scene
Over the summer I created my first anit-gravity scene as a starting point for my assignment. As shown in the images below I have incorporated two space helmets, two pairs of space boots, a lamp, a camera and a torch. I have animated this scene to make these objects float seamlessly, some do collide and ricochet off each other however, this was done intentionally to add to the overall anti-gravity effect as the lack of gravity provides no direction. The feedback I received from fellow classmates stated: the speed at which the objects floated at was accurate and overall the scene looked like it could be real
Subscribe to:
Comments (Atom)